Some one asked me recently
"When I set up, my table looks clean, organized and professional, but once I start working and if I get so busy, it looks like a mess, now I don't have pots of paint everywhere but still messy, how do you keep your set up clean and neat while you work?"
First of all if your set up is messy, it's not the end of the world. But if it's 'dirty' then you have a problem. 'Messy' and' Dirty' are different, and 'Clean' and 'Tidy' are different, and a makeup table can end up being a combination of them
- Messy - Stuff all over the place, not organised, looks chaotic, disorderly, and is in disarray.
- Tidy - Arranged neatly and in order. Everything in it's place, neat, organised and well kept.
- Dirty - Covered or marked with an unclean substance, stained, not washed, soiled, old and dusty, and is a contamination risk
- Clean - So as to be free from dirt, marks, or unwanted matter, Washed, sanitized, not growing mold etc
Clean and Tidy is the ideal, however messy but clean is also not bad.
Dirty and tidy is bad, and messy and dirty is the worst.
Why is dirty a bad thing?
When makeup stations have paint dribbles and smears everywhere, the appearance is nasty but the least of your worries. This paint out of the container will collect dirt, grime hair, clothing fiber, and germs. Yes, most face paints do contain anti bacterial agents in them; but if you have used paint smeared on plastic or cloth and it can andwill breed bacteria. Then, when you have to of course, touch things in your kit, and this icky grime will get on your hands and fingers and transfer on to your tools.
The cross contamination is endless and compounding at this point!
Having a dirty makeup station is an excellent way to spread, pink eye, mono, and other germs that are contagious.
When I see dirty paint cases that have caked paint on them and look like they haven't been cleaned. I don't see a rushed artist; I see a surface that wasn't cleaned, and could have contagions living on it that
can live on surfaces for up to 2 weeks! When the surface is clean, then I'm less likely to think this.
So being clean is very important, so as professionals it's important that we clean out kits after each gig, or before a new day of gigs begins. This is basic, and standard sanitation, and excuses of "I don't have time" don't cut it. If we claim to be professional then we make the time.
Why is Tidy an important thing?
Maintaining a tidy table is important because if think about it; all those parents waiting in line, what are they looking at? They are looking at you, your paints, and your table. What do you want them to see? While messy might not be dirty, it can still 'look' dirty, and we don't even want that.
So I present....
My 8 Secrets to Keeping a
Clean and Tidy Work Space:
While I work!
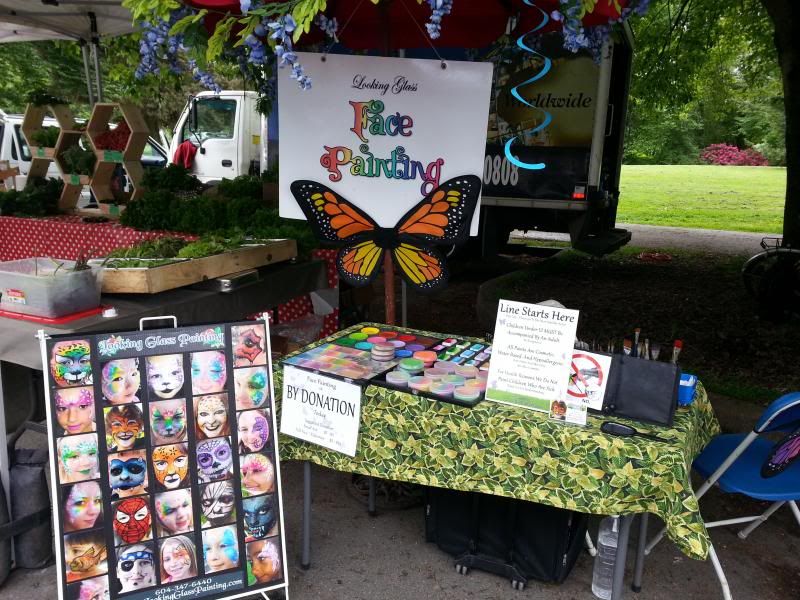
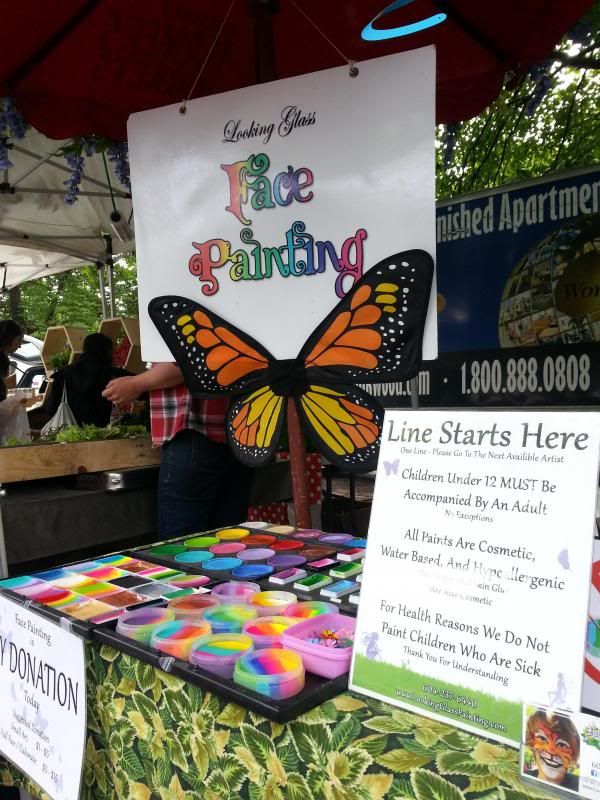
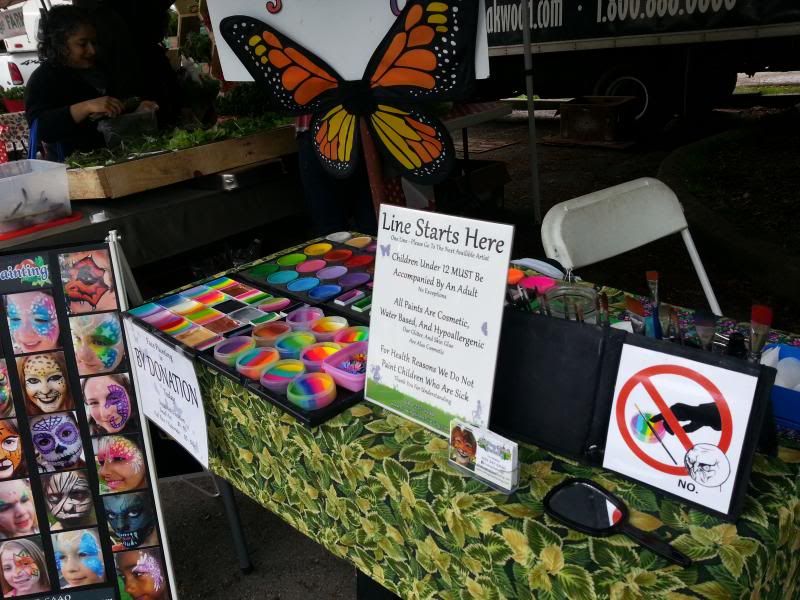
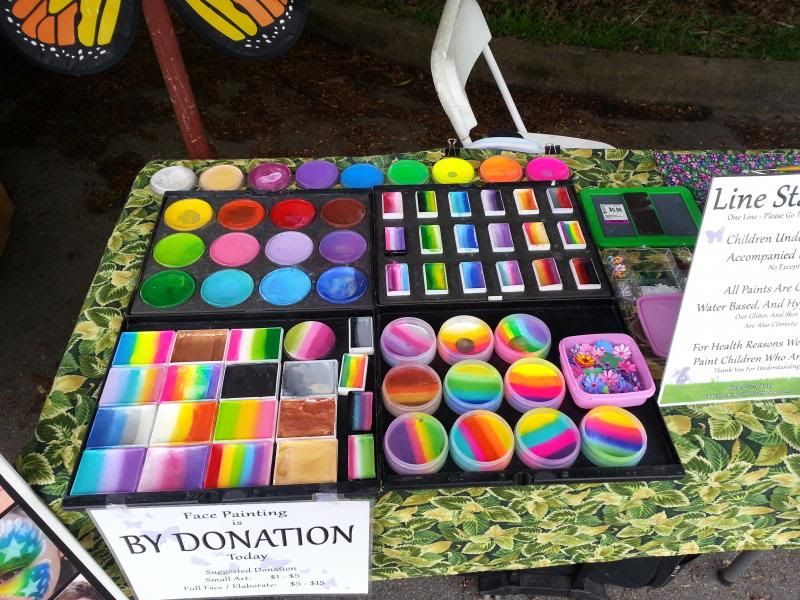
My Clean Face Painting Table:
VS
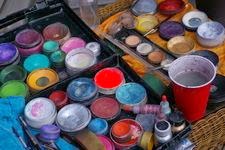
Dirty Face Painting Tables:
1.
2.

3.
4.
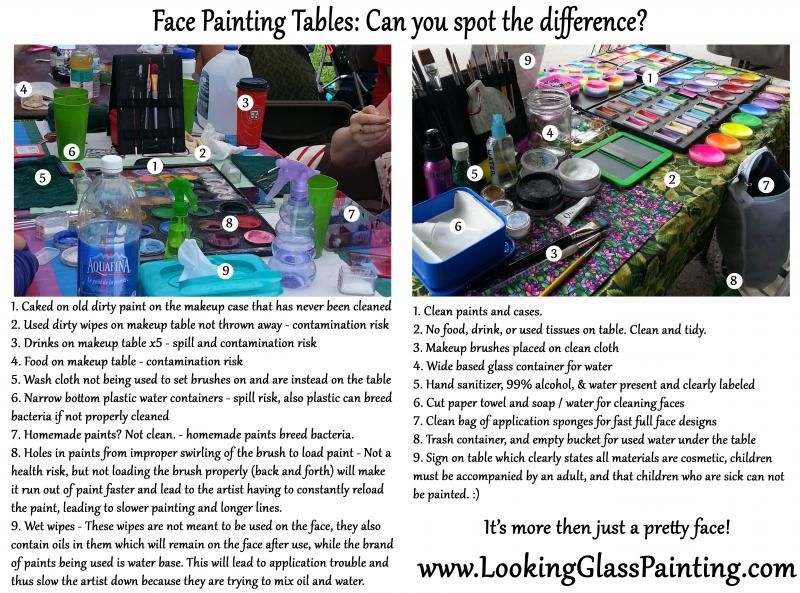
 Comparison
These are photos I have taken of face painting tables that i have seen in my city, some by some pretty big hitters in the industry.
On to the tips!
1. Have A Place For Garbage
I have a tiny bucket i got at the dollar store that i keep under my table as a place to keep trash. It's small and fits in my kit nicely. Used wipes for your hands, and tissues etc can all go in it and out of sight and more importantly OFF the makeup table.
In the makeup industry, we often tape open baggies to the table to put spent trash in to throw away later. But having your own little trash bucket is much more professional looking I think. ^.^
2. Organize
Try to set up your table the exact same way every time. It helps if you choose a side to work from, if you are right handed, then ALWAYS have your set up on your right, this can also help in avoiding back pains and strains for reaching. Put your jar in the same spot, your brushes, your hair clips, EVERYTHING should have a home. Even when it's used. I put my spent stencils in the same spot, i lay my brushes the same way in the same spot, and my spent sponges go in a separate sponge bag rather then cluttering my table. Also we never use the word, 'dirty' or 'used' in public when talking about our equipment, instead we say 'spent'. People who hear things can also internalize them, and i never want any one to think of my equipment as 'dirty'.
Bonus: Table organization will also help you paint faster as you know were everything is on your table without having to scan or search the table for it!
3. The 10 Second Tidy.
Ideally you want to put something back in it's place after you use it, like a rainbow cake, or notice how on my table I have a little container for hair clips. But some times when working fast things do get messy and forgotten. But having everything have a designated place helps when things get messy, you know where to return them to so everything looks tidy again. When things get too messy I take a moment to tidy a bit, I call this my '10 second tidy' after the show 'the big comfy couch' which I first heard the phrase. I even announce it so those in the line know I'm taking a moment to clear the clutter. "One moment folks, I'm just going to do a little 10 second tidy here because some times while I work things tend to sprout legs and pile up right next to me.

What can I say, my tools love me, and even more so when i take good care of them "
See what i did there? I let those watching know that I care about being clean looking, and that i take care of my things, all while telling a joke while they wait. People understand, and they don't mind waiting a moment or two while you put some sponges away, and change your water. In fact they thank you for it. Also remember to actually SAY out loud a reason why you are asking them to wait while you are tidying up EVEN THOUGH it's totally obvious.
Why?
Because adding a reason to your request is like a Jedi mind trick.
4. Save Table Space and Have Homes for things.
Much like being organised, having little boxes and containers for things is a huge asset and the more compact the better. I have a tiny container for my hair clips, my cut paper towels, my gems, etc. My cards are in a card holder, my stencils on a clip, and my water, iso, and soapy water atomizers are all small and fit nicely on the table (notice how they are also all different, and the iso is in a bright purple one so i don't mix them up).
Now compare that with the photos i posted of the other setups. in the first one up there has an entire large bottle of iso on the table, in the comparison photo we have large tub of wipes and several trigger spritzing bottles that look better suited to be used in a hair salon, or for holding Windex, rather then for the tiny spray needed to activate your paint. Also though I cut it off in the photo, the original photo also shows their business cards are strewn and scattered on one end of the table for people to help themselves too. Though really it only adds to everything looking messy and out of place.
Having places and containers for things saves on table space. Other great things for this are brush easels, fanny packs for your money instead of a tip jar (if you don't know the benefits of getting rid of your tip jar, check out my write up on
Tips for working for Tips), and other things. Compact it, and things will look more professional.
5. Preventative Maintenance
Clean what you can, when you can.
Lets take a look at
photo #4 of the dirty setups. Wow... that's pretty gross. This is a face painter at a circus as you can tell from the background and animals. This artist should be extra clean, but that clearly isn't happening. By all the colorful finger prints, the kits looks like it's never even been wiped down!
Obviously you clean everything in your kit after a gig when you get home, but why wait? If I have a lull in my line sure I could check my phone, or paint a pretty flower on my arm, but what does my table look like? Before I touch my phone or decorate myself, I clean my kit. I wipe all the cases of paint stains and water drops, I clean all my stencils and put them away, wash all my brushes, clean the water, empty the trash etc. I do my chores before I play.
Also it's less for me to do when i get home.
6. If It's Not Face Painting Related, Keep It OFF The Table
No food, no drinks, no toys, no hats, no keys, no money etc. Not yours or anyone else's.
Things like date books, pens, extra cards, empty containers etc should all go under the table in your travel case, or in a reusable shopping bag or something as they only add un-needed clutter to your table. Things like your phone, you can keep on the table if you use it to take pictures of your work often, but otherwise should be in your pocket or purse. Anything to save table space and cut down on clutter.
7. Use A Large Enough Table

For my set up I require a min 4 foot table. If I really condense to the bare basics I can work off smaller, but it's not ideal. The point is to avoid having to stack things on top of each other. I try to never lay things over top of my paints, like my mirror, or other things. The paints are colorful and I want them to show and shine. They are a part of my display, and also that they are all in nice rows means that half of my table is already neat and organised looking by default. So i try not to cover it up. Notice in the 2nd photo i posted with the dirty red plastic water cup how the brushes are all over, the paints are all over, the glitter pots are all over. Stacking.... Yes you can do this and still be clean, but it won't be tidy. Try to have a large enough area to work, and if need be buy your own table and chairs and keep them in your car so you never again are forced to set up on a 2ft tall children's play table (this has happened to me more then once.... people are stupid).
8. Use Things That Are Easy To Keep Looking Clean
Clean white things are GREAT for making a clean setup, but difficult to keep clean as we all know. Notice my 'wash rag' that i put my brushes on? It's many different colors in an erratic looking pattern. I made about 10 of these when I found the fabric. It's really hard for this cloth to look messy when it has paint on it because of the colorful pattern. Also it has no white! Steer clear from things that are white, but don't avoid them all together as they can still make your set up 'look' clean and neat. The only white things I keep around are ones that are stupid easy to clean while on the job, like my signs.

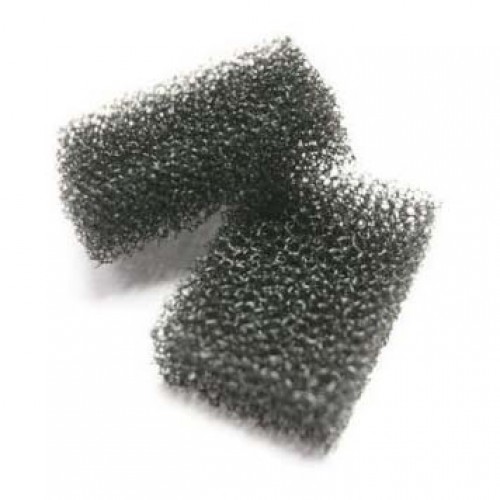
All my containers? Plastic. My table cloth? Patterned. My sponges? Dyed black! My water jar? Glass because it gets the most abuse and glass is stupid easy to clean and doesn't stain like plastic does.
----------------------------------------------------
Conclusion:
Anything to do with arts and crafts is a HUGE magnet for clutter and mess. Trust me, none of my craft tables at home look this awesome lol. But I'm very strict with what face I show to the public and my clients, and how i treat my equipment that is being used for makeup application. If i drop a brush, I spray that sucker with iso and set it aside to dry, that's just how I roll. It make seem strict, but it's the standard in the makeup industry to sanitize your hands after touching ANYTHING that is not your client or your tools. Even your own hair, or their hair, you must sanitize afterward. Of course i don't get THAT crazy with face painting, or else i would be scraping paint out of my cakes on to a metal pallet with a tiny spatula for every design, and throwing away what was not used. But I know the paints have an anti-bacterial agent in them, and I know not all makeup industry standards are practical for face painting. Though I try to adopt as many of them as I can while I work.
Here are photos of my set up that I took in a hurry before I was swarmed at the farmers market. (just a note, I do keep the lids on the rainbow cakes at the front of the table because kids like to touch them and they are at the right height for that. I just took the lids off for the pictures to help the colors be seen better.

)
I hope this write up has helped!
Please share photos of your table set up or things you do to help keep yourself clean and tidy while working, or photos of other 'dirty' table setups you have seen! I think we can all learn from them, which is the big reason I take photos of them.
Thanks for reading!


